How to Set Up Bitaxe for Solo Mining: A Step-by-Step Guide
 27 Feb 25
How to Set Up Your Bitaxe Miner: A Beginner-Friendly Guide
The Bitaxe miner is a compact and open-source Bitcoin mining device designed for home use. With its efficient AxeOS interface, it offers a straightforward way to kickstart your mining journey. Whether you're new to mining or simply looking for a fun, low-power setup, the Bitaxe combines accessibility with functionality. In this guide, you'll learn how to set up your miner, configure key settings, and ensure smooth operation. By the end, you'll be ready to connect to a pool or solo mine with ease, maximizing your device's potential.
Understanding the Bitaxe Miner and AxeOS
Whether you're new to Bitcoin mining or a seasoned enthusiast, the Bitaxe miner is a standout in the world of compact home-use mining devices. Designed with accessibility and high-performance output, this open-source miner pairs seamlessly with its companion software, AxeOS. Let's explore what makes the Bitaxe series and AxeOS software essential tools for mining efficiency.
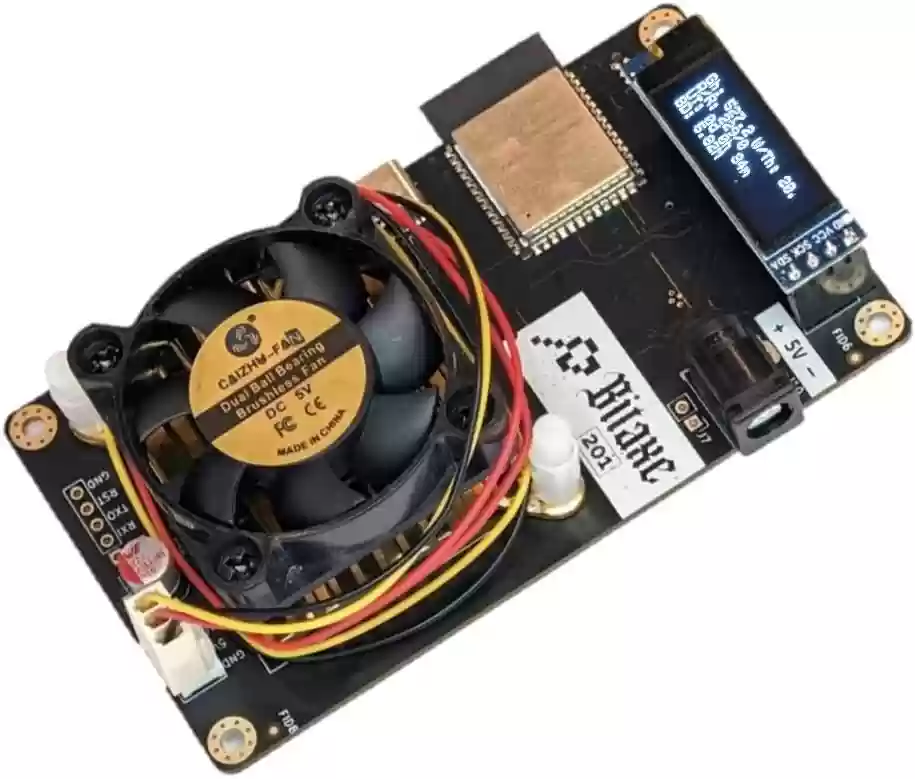
Overview of Key Components
The Bitaxe miner is a compact and efficient device, but like any machine, its individual components play critical roles in its overall performance. Here's a closer look at the core parts that make up your miner:
-
ASIC Chips: At the heart of your Bitaxe miner are the ASIC chips, specialized for Bitcoin mining. These chips are optimized for the SHA-256 algorithm, delivering excellent energy efficiency and high hashrates. Depending on the model, you’ll find variations such as BM1397 or BM1366, each with unique performance characteristics.
-
Cooling System: Efficient heat dissipation is critical. Your Bitaxe typically uses 5V fans to maintain temperature levels and prevent overheating. The cooling system ensures the ASIC chips operate within their safe limits for maximum lifespan and performance.
-
Display Panel: The display provides operational insights like hashrates, error codes, and other performance metrics. It’s your interface for monitoring the miner’s status and troubleshooting potential issues.
-
Power Supply: A stable power source is fundamental for reliable miner operation. The Bitaxe utilizes external power supplies capable of matching its specific voltage and wattage requirements. Loose or suboptimal connections in this area can lead to instability.
These components work together to create a seamless mining experience. Regular inspection and maintenance are necessary to ensure everything operates properly.
What is AxeOS?
AxeOS is the brain of the Bitaxe miner, an intuitive and robust software that ensures you get the most out of your device. Think of it as the dashboard for your operation, offering convenient tools to monitor and optimize your mining activities. Key highlights of AxeOS include:
- Real-Time Monitoring: Keep tabs on performance metrics like hash rate, efficiency, and hardware temperature. AxeOS ensures you’re always informed about how your device is performing.
- Easy-to-Use Web Interface: With its seamless web-based dashboard, you don’t need a dedicated app or complex setup process. Just connect your device to a browser to check and tweak your settings.
- Performance Optimization: Control fan speeds, adjust power settings, and manage the chip frequency for better output. AxeOS gives you granular control to strike the perfect balance between performance and energy usage.
- Automatic Updates: Stay ahead with the latest features and performance upgrades without the manual hassle. This ensures compatibility and peak operation at all times.
Pairing the power of Bitaxe devices with AxeOS, miners get an unbeatable combination of hardware and software efficiency. The real-time feedback and adaptability of AxeOS make it not just a supporting tool but a key part of the mining ecosystem.
Preparation for Setting Up the Bitaxe Miner
Before turning your Bitaxe miner on, creating the right setup environment is crucial. A little preparation will save you time and frustration later. Here’s what you need to do before you start:
-
Set Up a Suitable Workspace:
- Choose a cool, well-ventilated area to operate your miner. Avoid cramped spaces, as airflow is critical for keeping equipment cool.
- Ensure the room temperature is stable and doesn’t exceed the miner’s operating limits.
-
Organize and Label Components:
- Carefully unpack your Miner Box. Lay out components such as the PCB, fans, and cables in an orderly manner.
- Consider labeling wires and peripherals (e.g., USB cables, Ethernet) to avoid confusion during setup.
-
Follow Safety Precautions:
- Ensure your power connections are secure and meet the voltage/wattage recommendations of the miner model. Using a PSU with lower capacity than required can result in malfunctions.
- Use a surge-protecting power strip to guard against sudden voltage spikes. Electrical safety is non-negotiable.
-
Prepare Essential Tools:
- Have a basic toolkit ready, such as a multimeter, screwdrivers, and cleaning tools like compressed air for dust removal.
- If you need to reapply thermal paste on the ASIC chips or heatsinks, make sure you have high-quality thermal paste on hand.
Taking these small but important steps not only makes the setup process smoother but also sets a strong foundation for long-term, efficient mining. Treat this as assembling a high-performance team, each part must work together. With everything organized and ready, you’re now prepared to move to the next step in your Bitaxe journey!
Downloading the Latest Firmware
The software side of your Bitaxe miner is just as critical as the hardware. For optimal performance, start by downloading the most up-to-date AxeOS firmware.
- Access Official Sources: To protect your miner from malware or faulty updates, always download firmware from verified platforms. You can find the latest releases from GitHub here.
- Verify Compatibility: Ensure you're downloading the firmware version that matches your specific Bitaxe model.
- Installation Guide: Once downloaded, follow step-by-step instructions to flash the firmware onto your miner. A detailed walkthrough can be found here.
Keeping your miner updated with the latest firmware boosts efficiency, resolves bugs, and ensures compatibility with evolving Bitcoin mining protocols.
Step-by-Step Configuration of the Bitaxe Miner
Getting your Bitaxe miner operational is simpler than you might think. With a few steps, you’ll have the device powered on, connected to your network, and ready to generate hash power. Here’s a breakdown to guide you through the process.
Connecting the Hardware
Before powering up your Bitaxe miner, it’s crucial to ensure all hardware components are securely connected. Here’s what you need to do:
- Power Supply: Use the provided power adapter or a compatible PSU, ensuring it meets the voltage and wattage requirements of your Bitaxe model. Avoid using third-party adapters that don’t guarantee the stability your miner needs.
- Data Cables: Connect the data cables to their designated ports. Each connection should click into place securely. Loose cables can lead to operational interruptions or errors.
- Cooling Components: Attach the cooling fans to the miner if they aren’t pre-installed. Ensure the airflow is directed appropriately. Proper cooling prevents overheating, especially during extended mining sessions.
Double-check all connections before plugging the device into a power outlet. Place the miner in a well-ventilated space to maintain optimal cooling performance.
Accessing the Configuration Page
Once the hardware is connected, the next step is to access the Bitaxe miner’s configuration interface through its built-in Wi-Fi access point:
-
Finding the Wi-Fi Network:
- Power on the Bitaxe miner, and wait for it to boot up.
- Go to your computer or smartphone’s Wi-Fi settings, and look for a network named something like
Bitaxe_XXXX. Connect to it.
-
Navigate to the AxOS Page:
- Open a web browser, and enter the default IP address for the miner's control panel (often provided in the device manual or displayed on the screen, e.g.,
192.168.4.1). - Once loaded, you’ll gain access to the AxeOS interface, where you can customize settings and start the setup process.
- Open a web browser, and enter the default IP address for the miner's control panel (often provided in the device manual or displayed on the screen, e.g.,
If for any reason you cannot locate the Bitaxe network, ensure the miner is in range and operating on a compatible 2.4GHz Wi-Fi band.
Entering Essential Settings
With the configuration page open, you’ll now input the key settings to get your miner operational. Accuracy is critical here, as errors can prevent the miner from functioning correctly:
-
Wi-Fi Credentials:
- Go to the Network tab and input your home Wi-Fi SSID (Wi-Fi network name) and password. These fields are case-sensitive, so be sure to enter them exactly as they appear.
- Save the settings and restart the device. Once connected to your Wi-Fi network, the Bitaxe will display a new IP address for accessing the configuration page.
-
Mining Pool Configuration:
- Under the Mining Settings section, enter the details of your preferred mining pool. Typically, this includes the pool URL, your worker name, and password (often optional or default).
- Review the information twice to ensure accuracy. A single typo can prevent the miner from establishing a connection with the pool.
-
Bitcoin Wallet Address:
- Add your Bitcoin wallet address where mining payouts will be sent. Make sure the address is correct and supports on-chain transactions, mistakes here can result in loss of funds.
- Click Save Settings to finalize the configuration.
Your Bitaxe miner will now begin syncing with the mining pool and preparing to start operations. Monitor its system outputs via the AxeOS dashboard to ensure everything is running smoothly.
Be cautious to double-check all entries, as incorrect details might prevent your miner from connecting.

Running Diagnostics and Initial Tests
Once configuration is complete, testing is crucial to ensure your setup is functioning as expected. Here’s how you can verify that your Bitaxe miner is ready for action:
- Check the Hash Rate: In the AxeOS interface, navigate to the dashboard to confirm the device’s hash rate. A steady rate indicates proper mining functionality.
- Monitor Temperatures: Ensure your device’s cooling mechanisms, such as fans, are active and maintaining a safe operating temperature.
- Diagnostics Tools: Use the built-in tools in AxeOS for self-tests. These will detect any potential configuration errors or hardware issues.
Any red flags, such as fluctuations in hash rates or overheating, should be addressed immediately.
By following these steps and tests, your Bitaxe miner will be ready to start mining efficiently with AxeOS.
Common Setup Challenges and How to Overcome Them
Setting up your Bitaxe miner can be exciting, but it isn’t without its hurdles. From WiFi issues to firmware complexities, small challenges can quickly become frustrating if you’re not sure how to resolve them. Below, you’ll find practical solutions to some of the most common setup issues. Let’s tackle these step by step so you can get your miner running smoothly.
WiFi Connectivity Issues
A reliable WiFi connection is essential for your Bitaxe miner to function. However, poor signal strength or incorrect network settings can derail your setup. Here’s how to troubleshoot:
- Check Signal Strength: Weak WiFi signals often result in failed connections. Make sure your miner is within range of your router and isn't obstructed by walls or large metal objects. If needed, consider using a WiFi extender to improve coverage.
- Verify SSID and Password: Double-check that you’ve entered the correct WiFi network name (SSID) and password. These fields are case-sensitive, so even a small typo can prevent your miner from connecting.
- Router Security Settings: Some routers have advanced security features like MAC filtering or AI firewalls that might block your miner. Ensure your router allows connections from the miner. You may need to disable certain protections temporarily or whitelist the device.
- Restart Devices: Sometimes, all it takes is a restart. Power off your router and the Bitaxe miner for a few minutes before turning them back on.
If the issue persists, try connecting your Bitaxe to a different network or use a direct Ethernet connection (if supported) for initial setup.
Firmware Flashes and Updates
Outdated or buggy firmware can cause instability or glitches in your miner's performance. Firmware updates are crucial to ensure optimal functionality. Here's how to approach them:
- Download the Correct Firmware: Visit the Bitaxe official firmware page on GitHub repository to download the latest update files (e.g.,
esp-miner.binandwww.bin). Be cautious of third-party sources that might provide incompatible or corrupted versions. - Use the Right Tools: You'll likely be using the integrated AxeOS web interface or a flashing tool like Bitaxetool. Ensure your USB cable supports data transfer if you're using a physical connection.
- Backup Current Settings: Before flashing new firmware, note your mining configuration settings (like pool details and wallet addresses) as some updates reset the device to factory defaults.
- Perform the Flash:
- Access the AxeOS interface via your miner's IP address.
- Navigate to the firmware update section, upload the necessary files, and follow the on-screen instructions.
- Reboot and Test: Once the update is complete, restart the miner and monitor it for any unusual behavior. A working update should stabilize performance, reduce errors, and ensure compatibility with the latest mining protocols.
Firmware flashes improve your miner's reliability, but avoid interrupting the process. A power failure mid-update could result in a bricked device requiring a factory reset.
Display Panel Not Responding
The small OLED screen on your Bitaxe miner gives vital information, such as the IP address, hash rate, and error messages. If the display doesn’t work, it can feel like flying blind. Here's how to resolve the issue:
- Check Physical Connections: A loose cable is often the culprit. Gently press down on the OLED panel to ensure it’s properly seated. If possible, use a multimeter to test continuity between the display pins and the board.
- Perform a Reboot: Restart the miner by unplugging it from power and waiting 30 seconds before plugging it back in. A simple reboot can fix temporary glitches.
- Update Firmware: As mentioned earlier, bugs in outdated firmware may cause the display to fail. Reflash the latest firmware to eliminate software-based issues.
- Inspect Screen for Damage: If the screen remains unresponsive after these steps, inspect it for physical damage. You can order a replacement OLED panel and swap it out if necessary, as these panels are often modular and easy to replace.
In the rare case the issue persists despite all efforts, the problem may lie in the hardware itself, such as a failed microcontroller. Contact your Bitaxe support channel or reference the community forums for additional guidance.
By addressing these common setup issues methodically, you’ll set your Bitaxe miner up for success and minimize downtime.
Optimizing Performance After Setup
Once your Bitaxe miner is up and running, you can fine-tune its settings to improve performance and prevent issues down the line. It's not just about letting the machine run, minor adjustments can have a significant impact on efficiency, power consumption, and the longevity of your equipment. Below, we’ll cover practical steps to optimize your miner by tweaking key settings, maintaining cooling systems, and addressing performance hiccups.
Adjusting Voltage and Frequency
Fine-tuning the voltage and frequency settings on your Bitaxe miner can enhance its hashrate while keeping energy usage under control. However, these adjustments require care to avoid damaging the hardware. Here’s how to approach it:
-
Understand Your Miner’s Limits:
- Check the device documentation or AxeOS interface for the recommended voltage and frequency ranges. Pushing settings too far can lead to overheating or component failure.
- Start with small changes to avoid stressing the ASIC chips unnecessarily.
-
Increase Performance Incrementally:
- If overclocking, raise the clock speed in small increments (e.g., 10-20 MHz). After each adjustment, monitor the miner’s stability and temperature.
- For undervolting, gradually lower the voltage until you find the sweet spot where hashrates remain consistent but power consumption drops.
-
Keep an Eye on Results:
- Track hashrate and temperature metrics using the AxeOS dashboard. Sudden spikes in temperature or drops in performance are signs the settings may need tweaking.
- Consider using community-recommended frequency presets for your Bitaxe model as a starting point.
-
Test for Stability:
- Let the miner run for several hours under the new settings. If you encounter frequent crashes, instability, or errors, roll back the changes and try different values.
By making these small adjustments, you can improve efficiency and reduce electricity costs while maximizing mining output.
Monitoring and Managing Cooling
Efficient cooling is critical for your Bitaxe miner’s performance and longevity. Overheating not only reduces hashrate but also wears down components over time. Here are tips to stay on top of your cooling system:
-
Ensure Proper Airflow:
- Place your Bitaxe in a well-ventilated area, ideally away from walls and other obstructions. Keep the intake and exhaust vents clear to allow air to flow freely.
- If possible, install additional fans in your space to enhance circulation, especially if you’re running multiple miners.
-
Regularly Clean Dust Build-Up:
- Dust can clog your cooling fans, reduce airflow, and cause overheating. Use a can of compressed air to clean the miner every couple of weeks. Don’t forget to power off the machine first for safety.
- Check for dust on heatsinks and PCB components, as these areas are crucial for heat dispersion.
-
Monitor Temperatures Consistently:
- Use the temperature readings displayed on the AxeOS interface or the miner’s OLED screen to stay informed. Optimal operating temperatures are typically between 20°C and 40°C (68°F to 104°F), but consult your specific model’s manual for exact figures.
- If temperatures regularly exceed safe limits, consider upgrading to more powerful cooling solutions like larger fans or external AC units.
-
Adapt to Seasonal Changes:
- Mining rooms can get hotter during summer months. Plan ahead by moving your miner to a cooler location or installing extra cooling to handle the increased ambient temperature.
Proper cooling not only sustains steady performance but also extends the life of your miner, helping you avoid costly repairs or replacements.
Troubleshooting Performance Drops
Hashrate drops and overheating can occur even with the best setup. Diagnosing and resolving these issues quickly ensures your miner continues operating at peak efficiency. Here’s how to tackle common performance problems:
-
Check for Software Issues:
- Begin by rebooting your Bitaxe miner to clear any temporary glitches.
- Verify that you’re using the latest firmware version. Firmware updates often include bug fixes and optimizations that can address performance drops.
-
Inspect Hardware Connections:
- Loose or faulty cables can disrupt power delivery and data transfer. Double-check all connections, including power cables, Ethernet lines, and cooling fan wires.
- Examine the ASIC chips and heatsinks for visible damage or signs of unusual wear.
-
Review Mining Pool Configuration:
- Incorrect pool details or server downtime can reduce your hashrate. Ensure the pool URL, worker name, and any other settings are accurate.
- Use multiple mining pools as a backup plan to avoid interruptions if one pool goes offline.
-
Address Overheating:
- If the temperature exceeds the recommended safe range, stop the miner immediately to prevent damage. Allow it to cool down before restarting.
- Confirm that all fans are spinning correctly and operating at full speed. Replace broken fans promptly to restore cooling efficiency.
-
Analyze Logs for Errors:
- Access the logs via the AxeOS interface to identify error messages or unusual activity. Community forums and official Bitaxe support channels can help you interpret these logs if needed.
By approaching performance drops methodically, you can resolve most issues before they escalate into bigger problems, keeping your miner productive and reliable.
Investing time into optimizing your Bitaxe miner's performance after the initial setup pays off in the long run. With small, thoughtful adjustments and regular maintenance, you’ll maximize efficiency and enjoy smoother mining operations.
Conclusion
Mastering the troubleshooting and setup process for your Bitaxe miner doesn't have to be overwhelming. By addressing common challenges like WiFi connectivity, firmware updates, and hardware configurations, you'll ensure smoother operations and optimized performance. Small steps such as keeping your miner cool, updating to the latest firmware, and maintaining stable network connections go a long way toward minimizing issues.
Consistency is key. Regular maintenance and monitoring will extend your device’s lifespan and keep your mining efforts running efficiently. If problems arise beyond your expertise, resources like Bitaxe Support and community forums are there to assist.
For those eager to explore more ways to maximize your mining success, take the time to review additional resources or connect with fellow miners. With the right approach, your Bitaxe miner can be a reliable and productive part of your Bitcoin journey.
Share On
Start Solo Mining For Free!
Go HereRecents

How Regulatory Pressure is Transforming Bitcoin's Market Cycles
Introduction: The Four-Year Cycle No Longer Holds SwayBitcoin has long been reco...

Bitcoin Price Hovers Near $95,000 Amid Regulatory Uncertainty in US Crypto Market
Bitcoin Stalls Below $95K as US Crypto Bill Raises Market ConcernsBitcoin's pric...

Sui Mainnet Faces Unexpected Downtime, Halting On-Chain Transactions
Sui Blockchain Experiences Significant Mainnet DisruptionSui, a rising layer one...

NYC Token Faces Controversy After $2.5 Million Liquidity Withdrawal Sparks Rug Pull Accusations
NYC Token Under Fire as Major Liquidity Withdrawal Triggers Community AlarmThe N...

Federal Reserve Building's $2.5 Billion Renovation Raises Questions Amid Economic Uncertainty
Federal Reserve Faced With Backlash Over Expensive Renovation PlansThe Federal R...

Federal Reserve Independence: Examining the Debate Around Powell and Monetary Policy
Mounting Pressure on the Federal Reserve and Its LeadershipAs the United States...

Meta Slashes 10% of Metaverse Division Amid Strategic Restructuring
Meta Reduces Reality Labs Headcount as Part of Broader Cost StrategyMeta, the pa...

Standard Chartered Prepares to Launch Crypto Prime Brokerage Platform
Standard Chartered Sets Sights on Crypto Prime Brokerage Service Standard Charte...

MicroStrategy Bolsters Bitcoin Holdings with Significant Purchase of 13,627 BTC
MicroStrategy Expands Bitcoin Holdings with Major AcquisitionMicroStrategy, a bu...

Solana’s Price Rebounds While Network Usage Remains Stagnant
Solana's Price Surges Amidst Subdued Network ActivitySolana (SOL), a leading sma...
Previous Posts

How to Set Up NerdMiner for Solo Mining on Bitcoin Testnet
Imagine mining Bitcoin without expensive hardware or complex setup. Bitcoin test...

How to Set Up a Bitcoin Solo Mining Rig: Step-by-Step Guide
Are you ready to dive into Bitcoin solo mining and earn big rewards? Imagine get...

Is NerdMiner Profitable? A Deep Dive into Solo Mining with Low Power
Many people wonder if solo mining with low power is profitable, like with NerdMi...
NerdMiner Guide: How to Start Solo Mining with ESP32
Exploring cryptocurrency raises a key question: can you mine bitcoin with an ESP...

Overclocking Bitaxe: How to Maximize Your Solo Mining Profits
Bitcoin mining is getting more popular, and miners want to make more money. They...

Solo Mining Bitcoin on NerdMiner: What Are the Chances of Finding a Block?
When we dive into the world of cryptocurrency, a big question pops up. What are...

Solo Mining Success Stories: Miners Who Hit the Jackpot
What does it take to earn big as a solo Bitcoin miner? A recent story of a miner...

Solo Mining vs. Pool Mining: Which One Should You Choose?
In the world of Bitcoin mining, a key question is how to mine Bitcoins most effi...

What Happens When a Solo Miner Finds a Bitcoin Block?
In the world of cryptocurrency mining, a key question is: what happens when a so...

What Is a Meme Coin? Exploring Meme Cryptocurrencies
Meme coins are a unique phenomenon in the cryptocurrency world, blending interne...
Next Posts

Ethereum Explores Distributed Block Building to Strengthen Censorship Resistance
Ethereum Charts Path Toward Greater Censorship ResistanceLeaders within the Ethe...

Bitcoin’s Four-Year Cycle and Power Law Suggest Predictable Market Movements Ahead
Bitcoin’s Market Movements Aligned with Historic Four-Year CycleThe cryptocurren...

Stablecoin Payment Cards Set for Rapid Growth by 2026, Report Predicts
Stablecoin Cards Poised for Breakthrough by 2026A recent report by crypto invest...

Bitcoin Technical Indicators Signal Bullish Momentum Amid $90K Price Battle
Bitcoin Approaches $90,000 as Technical Indicators Signal Renewed BullishnessBit...

Bitcoin Stays Resilient Near $91,000 as Investors Watch U.S. Jobs Data and Geopolitical Tensions
Bitcoin Holds Steady Around $91,000 Amid Market UncertaintyBitcoin maintained a...

TrueBit Token Plummets Following Exploit and Sudden Token Minting
TrueBit Suffers Exploit: Price Drops as Hacker Mints Millions of TokensThe decen...

Truebit Token Plummets After Alleged $5.9 Million Exploit and Rapid Minting Bug
Truebit Faces Crisis After Multi-Million Dollar Token ExploitThe decentralized c...

XRP Emerges as 2024’s Top Cryptocurrency Contender After Impressive Early Surge
XRP Takes Center Stage in the 2024 Cryptocurrency LandscapeAs 2024 unfolds, XRP...

XRP Emerges as 2024’s Breakout Cryptocurrency, Capturing Investor Attention
XRP Takes Center Stage After a Strong Start in 2024XRP, the digital asset native...

Bitcoin Whales and Sharks Accumulate as Bulls Bank on Price Recovery
Bitcoin Heavyweights Boost Holdings Amid Market CorrectionLarge-scale Bitcoin in...